
Diamond Painting Tips and Tricks
One of our customers, Barbara recently reached out to us to give us a sneak peek of her latest Diamond Painting project.
Her observations, advise and technical knowledge were so impressive that we invited her do write a special guest post.
You can find the full range of our authentic Diamond Dotz here.

From Barbara:
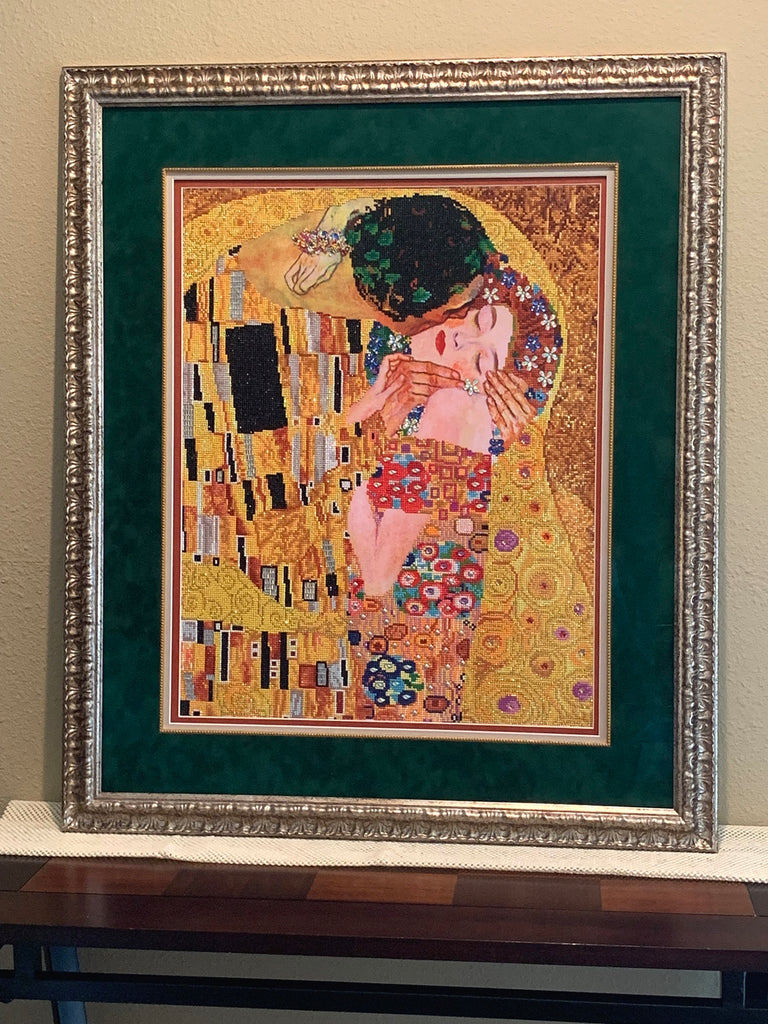
I ordered The Kiss from you in April, and it took over 3 months to complete. The design is a generous 22" x 28”,with the frame, three mats, and fillet it has become substantially larger. I opted for museum-grade clear acrylic instead of glass (it's lighter weight), as another person told me that she does put glass on the ones she frames. Besides keeping it clean and dust free, the high-grade glass/acrylic protects the work from fading.
A trick I learned, is that after the work is finished, it needs a couple of coats of Deco Art Triple-Thick Glossy Glaze to be brushed onto the tiles, to prevent the tiles from popping off. It must be glossy glaze! A matte glaze would dull the sparkle of the tiles!
I let the project cure for a week before adding any glaze; then a week after each glaze coat.
I did not glaze the untiled portions of the project, as I felt the faces and arms needed to look matte, for contrast.

Another idea, you will see a bracelet on the wrist of the lady's arm that is around the man's neck. I created it, feeling there needed to be more color in that part of the project.
There’s nothing stopping us from embellishing a kit if we are feeling creative!
I sorted all the colors & gems into 38 small-to-large jars & labeled them. The pink wax makes it possible to pick up the individual tiles with the stylus. The little tray helps you shake the tiles so that they are right side up, for picking up.
The entire sheet is pre-glued, and covered with a cellophane sheet, to prevent the glue from drying out on the untiled areas. The pre-gluing helps keep your tiles in place.
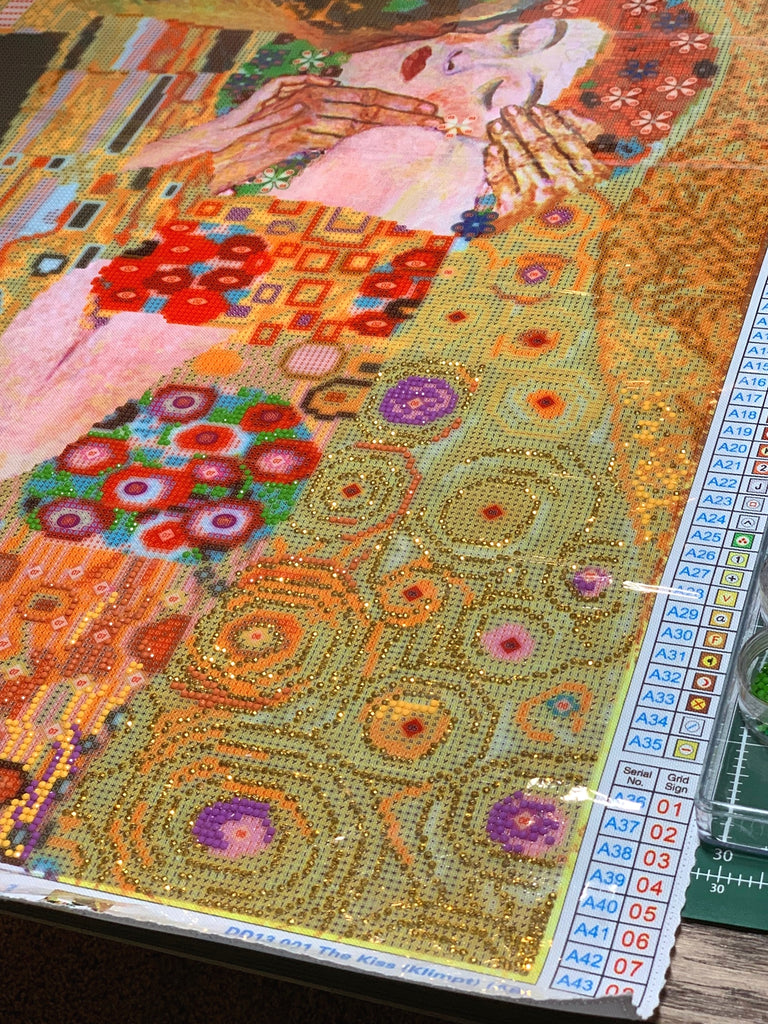
A very helpful accessory I used during my project was a flat, 8 x10 “light board”—The canvas in the kit was translucent, so light from the electric light board showed through the thin canvas, illuminating the tiny numbers all over the project from underneath it, making it easy to read the letters & numbers.
Another helpful accessory is an “Ott Lite” (brand name for a standing true-daylight lamp). My Ott Lite also has a flexible magnifier arm with its own light, which is really helpful if you have a kit whose canvas is opaque. Those numbers are really tiny, in my opinion, and the lighted, hands-free magnifying lens was a godsend.
Right now I am working on one that is 16" x 16" 100% drilled, depicting a vase of Lilacs. This kit uses round diamonds, rather than square-shaped diamonds. Meaning that the canvas color coding is printed in little circles rather than a grid format.
Another bit of knowledge I’ve gained people should order kits that are 100% “Drilled,” which simply means that there are codes for tiles on every inch of the canvas - HOWEVER, in the case of those kits that have faces & arms of people in the kit, make sure that there AREN’T tiles on their faces!
I would like to also warn people about Diamond Dotz fake knock offs, what you see in the picture is not necessarily what you get! I just threw out a partly completed kit that had a beautiful icon of Virgin Mary in the advertisement—only to find out that, even though Mary’s face was the real face on the canvas, the rest of the canvas was not 100% “drilled”— only the immediate garb surrounding her face was numbered (“drilled”), and the entire ornate halo and other gorgeous additions were NOT numbered/drilled, with no tiles provided to decorate them!
Yet another kit, from the same overseas manufacturer, of “The Divine Mercy,” showed a very small picture of the kit in the ad, which didn’t reveal the fact that even the face of Christ was “drilled.” It was not a realistic face: it looked like a robotic face out of an old school digital video game like “PacMan”! That kit went into the “round file” at the speed of light, as soon as I saw how the “face” turned out!
To sum up, I love the Diamond Dotz kit I bought from you and can't wait to start my next design.
Sincerely,
Barbara